
"Geometry" Section
This section describes geometries (or solid sequences of segments) of the object. Since an object may have more then one geometry, there may be several Geometry sections. Then a number follows the section name: Geometry1, Geometry2, ...
To add a new Geometry section:
Sometimes it is possible that Geometry sections exist in the table
but you can't see them because they are hidden.
The View Sections dialog lets you show/hide
the table sections.
To show the Geometry sections:
Each Geometry section lists the segments which make up the geometry.
A segment may represent a dot, a part of line, a circular or elliptic
arc, a part of spline. In the table, the end of one segment usually coincides
with the beginning of the adjoining segment.
All the coordinates appear with respect to the the coordinate system of the object.
You can add a segment to the active section:
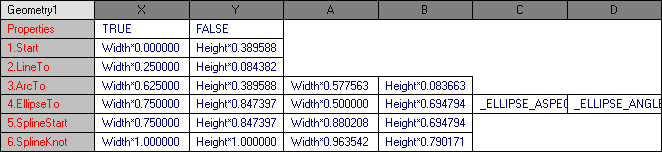
Properties.X
This parameter defines whether the geometry (the set of segments) is visible
or not.
The value appears in the binary format:
TRUE - the set of segments is visible;
FALSE - the set of segments isn't visible.
The default value is TRUE.
By changing this flag, you may hide or display geometries of an object.
In the formulas, this parameter is addressed in the following way
(N represents the number of the geometry):
| Geometry<N>.Visible |
Properties.Y
This parameter defines whether the fill of the object is visible. The value
is binary:
TRUE - show fill;
FALSE - hide fill.
The default value is TRUE.
In the formulas, this parameter is addressed in the following way
(N represents the the number of the geometry):
| Geometry<N>.Filled |
Start
The starting point of the set of segments. The X and Y fields contain the respective coordinates.
LineTo
A line segment.
This segment is defined by two points:
1) Begin point: the coordinates are taken from the X
and Y fields of the previous segment.
2) End point: the coordinates are stored in the X
and Y fields of the row.
ArcTo
An arc of a circle.
This segment is defined by three points:
1) Begin point: the coordinates are taken from the X
and Y fields of the previous segment.
2) End point: the coordinates are stored in the X
and Y fields of the row.
3) A point on the arc: the coordinates are stored in the A
and B fields of the row.
EllipseTo
An elliptic arc.
This segment is defined by three points and two additional parameters:
1) Begin point: the coordinates are taken from the X
and Y fields of the previous segment.
2) End point: the coordinates are stored in the X
and Y fields of the row.
3) A point on the arc: the coordinates are stored in the A
and B fields of the row.
4) The ratio of the large semi-axis to the small semi-axis: contained
in the C field.
If this value equals 1, an elliptic arc becomes a circular arc.
5) The large semi-axis angle: contained in the D
field.
The angle value is indicated with respect to the frame of reference of the object.
For items 1-3 in the Formulas mode the data are displayed in in tenths of millimeters, in the Values mode the data is displayed in the current unit of measure. For item 5 in the Formulas mode you see the angle in radians, in the Values mode the angle is displayed in degrees. The angle is usually within the 0 to 180 degrees range.
SplineStart
The starting segment of the spline.
It is defined by two points:
1) Begin point: the coordinates are shown in the X
and Y fields.
2) Guide point: the coordinates are stored in the A
and B fields.
The SplineStart segment in the table should be followed by one or more SplineKnot segments.
SplineKnot
A segment of the spline.
It is defined by four points:
1) Begin point: the coordinates are taken from the X
and Y fields of the previous segment.
2) Begin Guide point: the coordinates are taken from the A
and B fields of the previous segment.
3) End point: the coordinates are shown in the X
and Y fields.
4) End Guide point: the coordinates are stored in the A
and B fields of the row.
In the Formulas mode, you see the data in tenths of millimeters, in the Values mode the data is displayed in the current unit of measure.
For more information about the View Section dialog see Dialogs
- Modal dialogs - View Sections
For more information about the Insert Section dialog see Dialogs
- Modal dialogs - Insert Table Sections.
Return to The Table's Sections